Tuesday, March 30, 2010

Oven Roasted Cauliflower with Fresh Herbs

Cauliflower isn't one of those "stand up and applaud" kinda veggies, is it? Not a lot of people like this cruciferous vegetable. It is so very healthy. Great for digestion & it fights against estrogenic compounds found in our food supply and environment. (These compounds are found in, among other things, soy products, food additives, pesticides, and hormones in factory farm raised animals. They are prevalent in our environment from pollution. These compounds wreak havoc on our health and will upset our delicate hormonal balance.) I know.. blah..blah...blah.... boring. And cauliflower can be boring depending on how it is prepared.


I love it oven- roasted. A lot of people mash it up and dress it like mashed potatoes. I never really got on board with that one. I think the roasting brings out the unique flavor of this "clean as a white sheet" in color vegetable. But, as always, please don't roast it to death. Only about 10 to 12 minutes tops in the oven. You still want the pure white color and you want it crispy... and you want to maintain all the nutrients.


In this recipe, normally I use fresh herbs.... but as it is a lazy Sunday afternoon... I reached for the dried herbs. They work really well, too.

As always, I DO organic as much as possible!


Let's get to it!

After preheating your oven to 450 degrees, you will need the following:


Roasting pan
one head of cauliflower
1.5 T. of garlic olive oil. (I make mine with Extra Virgin Olive Oil and 6 to 8 cloves of garlic in the bottle)
1 T. Tarragon
1T. Rosemary
1T. Oregano
1/2t. black pepper

Break up the cauliflower into florets. Place in pan. Drizzle oil all over the top and toss until well coated. Bake for 5 minutes, then toss mixture and place back in oven for another 3 to 5 minutes.


Now, sprinkle herb mixture on top and gently toss. Place back in oven for a couple of minutes.


For those vegetarians out there.... you can sprinkle shredded Parmesan or Romano cheese over the top and toss around.


This is great to serve with baked sweet potatoes decorated with raisins and pecans and with a little drizzle of Agave over the potato.


This is what we are having for dinner tonight! I will probably add some steamed Brussel sprouts tossed in red pepper oil to complete this delicious meal.


For another roasted cauliflower variation..... I call it Confetti Cauliflower....... roast the same as above, use the same herbs, but sprinkle finely chopped red, yellow and orange bells all over the top of the cauliflower after you sprinkle the herbs. Roast for another 2 minutes. This makes a really brilliant looking dish... the bright colors against the white cauliflower.... very nice and very tasty!


Until Next Time......


GOOD HEALTH TO ALL!!

Monday, March 29, 2010

Sweet Pear Guac


My my..... Spring has come to Texas. Our pasture is full of beautiful wildflowers the color of the rainbow. The post oak trees are budding out.. which for one in particular.. is a miracle. After two months of triple digit temps last year..... I knew that tree was doomed and dead. But the cool spring temps and bright sunshine.. along with a LOT of rain the past month... has brought the old tree back to life.

This has nothing to do with preparing guacamole.... but as I sit here at the computer looking out the window... I just had to enjoy the spring time beauty for a moment. Ok, back to the point of this blog!

Growing up in northern New Mexico, I was raised on guacamole..... and not just plain 'cados and tomatoes with a few peppers thrown in..... but on many flavorful and odd variations. This is one of my favorites. This is made with ripe, sweet pears. And the organic Bartlet pears right now are just heavenly! Sweet, juicy and so ripe!

The one I used in this recipe is as ripe as it can get without spoiling. And this is the pear you want in this guac. Take the sweetness of the pear, the "sting" of the fresh pressed garlic, your favorite salsa, the heat of fresh jalapenos or New Mexico Hatch green chiles and the tartness of the lime.... you've got an explosion of flavors in your mouth that is completely off that boring beaten path of restaurant guacamole. I was out of cilantro... or you would have seen some of that in it as well.

Try other fruits with your 'cados, too. Fresh, sweet, organic pineapple with a little cayenne pepper is so very good. As is organic green grapes and organic chopped pecans. Just let your imagination run wild... get creative with your next guacamole!
As always..... I DO organic as much as possible

This is so simple and so quick.... here is what you will need:


*couple of avocados, peeled and pitted. Sliced in half and placed in a dish

*1 medium sized soft, juicy lime

*couple cloves of garlic, pressed or finely chopped

*your favorite salsa. I make mine by tossing fresh tomatoes, white onion, cilantro, jalapenos, fresh garlic, fresh lime juice in a food processor. Very easy.

*1 medium size ripe and juicy pear, finely diced

Squeeze the lime juice all over the 'cados... soaking them.
Take a knife and fork or potato masher and smash up the 'cados. I like mine with chunks in it.
Add the garlic, about a tablespoon of salsa and mix.
Gently fold in the pear. And that's it!


You are ready to serve this with your favorite chip, cracker or sliced cukes, jicama, or carrot & celery sticks. This is also great to serve on top of your favorite Mexican dish.... Veg*n enchiladas, tacos, tamales. Or for you non-Veg*nz...... serve on grilled salmon, tilapia or shrimp!


Hope you enjoy this!

Until Next Time.....
GOOD HEALTH ALL!!!


Monday, March 22, 2010

Spaghetti Squash Pasta


My favorite part of the market is the produce section! I just LOVE all the wonderful varieties of fruits and veggies.... especially now that my local grocery has an awesome ORGANIC section! I have to admit, there are still a lot of veggies that I have not had the guts to try yet. For example this one squash. I always just walk past this gourd-like vegetable with a tough, hard shell. Well, once I stopped and picked up one just to look at it and feel it. I heard spaghetti squash was really tasty.... but I just thought it was too much work. I was under the impression that I had to use a hammer and chisel to break thru that hard skin and then, I had to try and peel it and then julienne it to make the spaghetti strips! LOL!!! Little did I know that preparing this jewel was much easier than I anticipated.

Vegetable spaghetti, vegetable marrow, spaghetti squash, noodle squash, and squaghetti. All are name for a variety of squash or marrow (Cucurbita pepo) that looks like a small yellow watermelon, with flesh composed of long thin spaghetti-like strings. It averages 9 inches in length and may weigh 2 to 3 pounds. When cooked, the crisp, tender, spaghetti-like strands yield a mild lightly sweet and fresh taste. Keep in mind that the larger the vegetable, the thicker the strands and the more flavorful the taste.

I decided to pick up a squash this past weekend and "tackle" the preparation. I went online and found a great video that explains what to do with squash. I was happily surprised to see that after it is cooked.... the squash meat IS the spaghetti! Who knew? Certainly not me. LOL! I had so much fun making up this delicious pasta dish and the spaghetti squash really adds flavor, interest, and great texture. You can make it with your favorite veggies... and for you vegetarians... topping it off with your favorite shredded cheese would be delicious!

For this dish, I chose brocolini (baby broccoli,) orange bells, the spaghetti squash, TONS of garlic, spices and I tossed in some peas and carrots I had left over in the frig. And for my dish, I topped it off with chopped, fresh organic mango & served it up with some of my delicious oven roasted asparagus spears. Mmm Mmm Good!!! This turned out to be a beautiful dish in its presentation and so flavorful. You have the sharp spiciness of the garlic, the uniqueness of each spice and the sweetness from the mango. Really makes a nice combo.

If you’ve been reading my recipe blogs for awhile, you will remember how I feel about cooking the life outta vegetables. And SO many cooks do just that. They boil the color, the nutrients, the texture... literally.... the life outta the veggies. Personally, I never boil my veggies. I either steam them for a short 2 to 5 minutes depending on the veggie or oven roast them for a very short time. I like my veggies brilliantly bright with color, extra crispy and full of nutrients.

Ok, let's get started! And as always....... I DO ORGANIC as much as possible.

This is what you'll need:

About 3 cups of uncooked curly pasta. I used brown rice curly pasta for this dish, but you can use any kind.
1 large spaghetti squash
1/2 large orange bell, sliced in one inch slices
1 small bunch of brocolini, chopped one inch pieces
TONS of garlic
Pinch of fresh chopped rosemary, thyme and nutmeg
Chopped fresh mango
Extra Virgin Olive Oil
1 Large bunch of asparagus

Wash the squash and dry. Place in microwave oven on medium for 2 minutes, This will soften the shell so you can slice it open. Remove from microwave and place on wet cloth. This will secure the squash and make if safer when slicing it open with your BIG, sharp knife. Just slice it lengthwise. Then take a large spoon and scoop out the pulp and seeds. Place each half in a baking dish, sprinkle a little olive oil and black pepper over each half. Bake in 400 degree oven for 45 minutes. The squash is done when the shell is slightly soft and there is a little brown crust on top. When the squash has cooled, take a fork and begin pulling the pulp. You can see how it comes out like spaghetti! That is just the coolest thing ever!

Ok, now while the squash is baking for those 45 minutes, you can cook the pasta and set aside.

In a large sauté skillet, add some olive oil and TONS of pressed garlic. I used 4 to 5 cloves. Sauté over medium heat, but don't burn it. Add the brocolini & the orange bell and sauté just a minute or so. Then add one half of the squash and the pasta. Carefully toss till everything is coated with oil and now sprinkle the spices on top and gently toss again. Turn heat down to low, place lid on skillet and allow to steam for about one minute till hot.

Now, take the asparagus, cut off the ends, wash it and dry each piece as the olive oil will not work with wet asparagus. Place asparagus, single layer, in cookie sheet. Brush each one with either olive oil or garlic olive oil or basil olive oil, or roasted red pepper olive oil. Place in 400 degree oven for 3 to 4 minutes and it is ready! Look at that gorgeous brilliant bright green color!


Dish up a nice serving of pasta, top it off with the chopped mango and serve it up with your roasted asparagus. WOW!! Beautiful and deliciously healthy!

Until Next Time....


GOOD HEALTH TO ALL!!


Tuesday, March 9, 2010

March Meet Up

The next Vision Voice Veg*n'z for the Brazos Valley meet-up is Wednesday, March 10th 6:30pm at Village Cafe. Our speaker is Jenn Atkins. She is a certified nutritional consultant, a massage therapist, and a student of herbology. The topic of discussion will be "Living Sustainably".

Right now, Franchesca Garza and Tuxedo Mask are watching over our group (and have done an awesome job) while I take a little break. I look forward to returning to the leadership position in late June.

I invite you to check out the groups blog as I have updated some of the upcoming events!

Until Next Time.....

GOOD HEALTH TO ALL!!

Wednesday, February 17, 2010

Time Away to Rehab My Baby Boy Beagle

Nothing brings you to your knees and stops your heart as quickly as an injury to your "child." Whether it is a human child or a four-legged, furry little one with a tail.


On January 31st, our baby boy Beagle, Jack, ruptured a disc in his spine. T11/T12. In a matter of nano seconds he lost all use and mobility of his hind legs. He was completely paralyzed. We rushed him to Texas A&M University's Vet School immediately where he had emergency surgery to repair the disc. We were fearful that his spine had been damaged beyond repair and he would be paralyzed for the rest of his little life.

But with much prayers from a lot of folks and positive thoughts and optimism.... the little man came home on the 9th of February. Along with underwater rehab at TAMU, Hubby Bear and I are currently working daily with him to help him regain the use of his hind legs, coordination, strength and balance.


I've been extremely busy with this sweet boy and have not blogged in awhile. So many folks have inquired about HumbleVegan... and I thank you for checking in. I appreciate each one of you following HumbleVegan and look forward to returning to blogging in March.


So, for now... I am focused and dedicated to Jack and his recovery. I will post updates the next couple of weeks.

Be on the look out for HumbleVegan's return!


Until Next Time.....

GOOD HEALTH TO ALL!!

Friday, January 22, 2010

Humbled... By a NO LEFT TURN Sign


Yesterday I got a ticket...... it’s been 10 years since my last ticket. That one was for my usual, in a big hurry... speeding and not realizing it...ticket. Yesterday’s ticket was for making an illegal left turn.

What is it about getting a ticket that can transport you back to 2nd grade... when you would get into trouble for “whatever” on the playground? Right there, in front of everyone, the teacher would scold you. It would leave you feeling embarrassed, humiliated, beaten, and wanting to run away with your tail between your legs.

I got up at 4am yesterday morning... knowing it was going to be a relentless day of nothing but GO>>>GO>>>>GO>>>>>GO!!!! I was forced to hit the ground running as soon as I awoke. I had a TON of errands, (I HATE errands.. as errands = spending money.. and I HATE spending $$!) a TON of clients to train and had to fit in a hair cut and my own work out. With more “Stuff” to get accomplished then time to spare.. it was an easy set up for disaster.

In a short 45 minutes between clients... I zoomed to Target. Got stuff.. zoomed out and had to get to HEB. Well, BCS is known for making it as difficult as possible for patrons to access merchants by placing medians everywhere.... so right hand turns, in most cases, are the only options. Ok, HEB is right across the street from Target... I decided to go behind Target and then I could scoot across to the parking lot of HEB.... but.. oh no.... a partial median and a “no left turn” sign was staring me down.


This is when my better judgment took a nap. And my other little voice took over...... “Look, there are no cars in either direction..... just zip across, make the turn and “Tah Dah...” you can be at your destination without having to go way the heck outta your way!” Ok... so, I did it... and made it to the HEB lot... happily on my way to find a place to park so I could once again.. get out and zoom thru the store and get on to my next client.

Whoa! What is that in my rear view? Motorcycle with blinking, flashing lights? And then the question I always ask myself when I am about to be stopped by a policeman...”where the heck did you come from?” I guess in my “looking around” back there... I neglected to look for the famous “Holloman Motorcycle Cop.”


To my surprise, a LOT has changed in the 10 years since my last ticket..... As I got out of my car and approached the officer (I always do this.... I like to meet the police officers half way...odd, I know...) he introduced himself and was so very polite. He even complimented me on my hair cut! It made this "scolding" a little more tolerable.

So, my patience was challenged yesterday..... and it lost. I lost precious time, albeit, a pleasant experience with the Officer, it would have saved me the time I needed had I been patient and abided by the traffic sign. And, now I will spend money... paying for the "fee" for taking the course and paying for the course itself.... and I lose even MORE time when I have to sit in front of the computer for hours taking the course.... Blah!

This blog has nothing to do with being Vegan... but has everything to do with being Humble.

Until Next Time.....

GOOD HEALTH and PATIENCE TO ALL!!!


Monday, January 18, 2010

Say “BI-BI” to Flabby Arms

So, how’s that New Year’s resolution coming along? You know.. The one you vowed to lose those muffin tops this year? Or to lose the upper arm flab and “tone up?”

Here’s something to help you with those arms. This bicep work out combined with my Tri These Workouts for Great Arms, any of my cardio/circuit routines and a clean, healthy nutritional plan.... your arms will start to take shape in a short amount of time... and will look amazing in 6 months!

Training for so many years with so many women, one of the first things women tell me when asked "what are your goals?" “I want to shape up my arms and get rid of the flab.” I’ve shared with them that our upper bodies just don’t get the work out that our lower bodies do. If we could walk on our hands all day long, our arms would be freakishly strong & awesome looking! LOL!

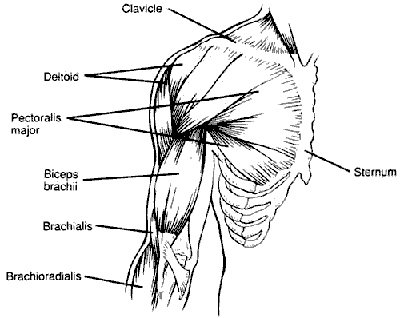
This routine works both bicips (biceps brachii & biceps brachialis) in several different positions. You can incorporate this into any work out program: full body, upper body, pulling muscles, or “arm day.” Just remember, don’t do this consecutive days in a row. Ok.....so let’s get started.

As always, if you have health issues, are deconditioned, have not worked out in awhile or lead a sedentary life check with your doctor before starting any exercise program.

BICEP WORK OUT

*Bicep Hammer Curl (Standing, hold dumbell in your hand like you would a hammer.. hence the name “hammer curl.” Keep your abs sucked in tight, keep your butt squeezed tight, have a little bend in your knees and stand up straight with good posture. Work one side then the other. Start with arm extended BUT DO NOT lock the elbow. Raise arm up to a 45 degree angle from the shoulder. Don’t go all the way up... the idea is to keep constant tension on that bicep.)


1 set of 15 reps x 8 to 12 lbs (depending on your strength)
rest 10 seconds
1 set of 12 reps x 8 to 12 lbs
rest 10 seconds
1 set of 8 reps x 8 to 12 lbs
rest 1:00 and repeat this once. after 2nd repetition, rest 2:00

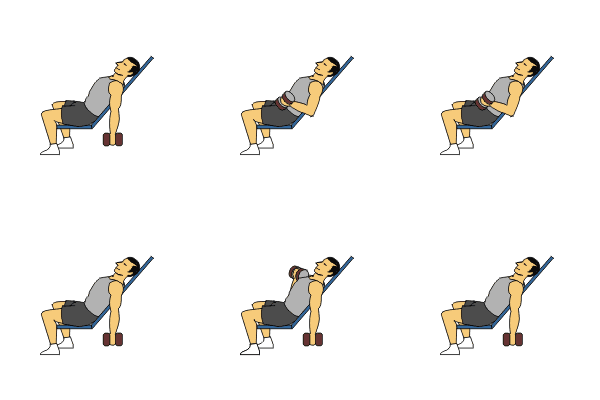
*Incline Bicep Curl (Set up an incline bench at around a 45 to 50 degree angle. Lie back on the bench with both feet on the floor, and lower back and scapula (shoulder blades) on the bench. You can raise your head if it is more comfortable then having your head on the bench. Keep abs and butt tight. Work one side then the other. Start with arm extended BUT DO NOT lock the elbow. Palms should face up toward the ceiling. When raising your arm, aim the third finger for the top of your shoulder. This movement, we want full range of motion, so raise the arm all the way up.)

1 set of 15 reps x 8 to 12 lbs (depending on your strength)
rest 10 seconds
1 set of 12 reps x 8 to 12 lbs
rest 10 seconds
1 set of 8 reps x 8 to 12 lbs
rest 1:00 and repeat this once. after 2nd repetition, rest 2:00


3-Way Bicep Curls (this exercise is quick and intense. You will use less weight because you are doing more reps per set. This routine works all sides of each bicep. Work one side then the other. Standing, hold dumbell in your hand with palm facing downward.. Keep your abs sucked in tight, keep your butt squeezed tight, have a little bend in your knees and stand up straight with good posture. The 1st position, extend the arm down but DO NOT lock the elbow. We want full ROM (range of motion) on this routine, so raise your arm all the way, but do NOT touch the shoulder. The 2nd position is full extension and a hammer curl hold. Same thing, raise arm up with full ROM. The 3rd position is full extension with palm facing up. Raise with full ROM.)

Position One: 25 reps x 5 to 8 lbs (depending on your strength) NO REST go to

Position Two: 25 reps x 5 to 8 lbs (depending on your strength) NO REST go to

Position Three: 25 reps x 5 to 8 lbs (depending on your strength)

Rest 2 minutes and repeat once more.


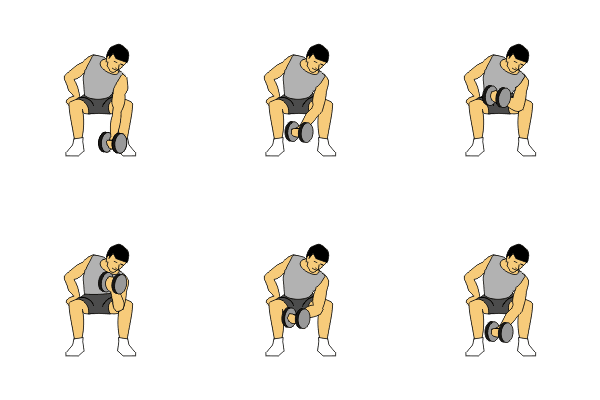
Bicep Concentration Curls (this and the Incline Bicep Curl are two of the VERY best bicep workouts you can do to get quick and fast benefits from your hard work. They both really make that brachii POP, giving you that "apple of your bicep! Sitting or if you are standing, place your leg up on a bench, chair, balance ball (this is the best as it makes your whole body work,) or any other platform. Keep abs and butt tight. Your leg should be bent close to a 90 degree angle. Working the arm on the same side as the lifted leg, place that elbow JUST BELOW the knee on the medial (inner thigh) side of the knee. NOT on TOP of the knee. Extend the arm down but DO NOT lock the elbow. Start with the hammer curl position and then as you raise the arm, twist so that the palm is facing the ceiling. When you lower the arm, toward the bottom, twist back into the hammer curl position. This movement is like the Bicep Hammer Curl, you don’t raise the arm all the way up. Stop around the 45 degree angle. We want to keep tension on the bicep thru the descending and ascending movements.)

1 set of 15 reps x 8 to 12 lbs (depending on your strength)
rest 10 seconds
1 set of 12 reps x 8 to 12 lbs
rest 10 seconds
1 set of 8 reps x 8 to 12 lbs
rest 1:00 and repeat this once. after 2nd repetition, rest 2:00

Take time to work this routine 3 times weekly and then enjoy the look you will see in the mirror and the compliments that you’ll hear.....”How do you get those arms?” “I want arms like yours!”

Until Next Time......

GOOD HEALTH TO ALL!!!